So... do I list all of my
Business sounds too stuffy, let's get back to baking instead! Last Wednesday I picked up our first CSA (Community Supported Agriculture) basket from the Coffelt Farm. First, let me say that the box of farm goods was so lovely, so gorgeous, and so packed with love. A cedar tree fell on the farm during the winter, and the decision was made to use the tree to construct sturdy, beautiful boxes with handles for the CSA program. I didn't have a camera with me when I picked up our box, but I sure wish I had... Radishes, Fava-tops, Spinach, Kale, Scallions, Chives, Eggs, Rhubarb, Lilacs and even honey filled our box to the brim. Add half a gallon of creamy fresh milk, and I enter a state of wide-eyed "how did we get so lucky??"
Of course, it isn't just luck. The farmers worked hard and planned long in order to bring such a glorious Spring harvest to our table. But we feel lucky to live in a place where we can make the decision to support a local farm, and bless ourselves with delicious, organic, local food from farmers we know. This is the moment I wish I could post a picture of our box... I'll have to take one this week instead.
But wait! There was one last item tucked into our box: a recipe for Rhubarb Custard Tart. Not having an oven, I wasn't sure how it would go, so I ran two different experiments, and am happy to report that both were completely (and happily) consumed. First I made the Custard Tart first without a crust (simpler and easier for a small space), and then with a modified crust. Both worked great. Of course, you can use a standard tart crust recipe too if you'd like, but I'm not addressing that in detail here.
(A brief funny story... When I served this the first time--in a rather dim evening light--before taking his first bite my husband expressed concern that I had made him a rhubarb omelet for dessert. This was the no crust version....)
Rhubarb Custard Tart
Recipe from Katy at Coffelt Farm
You will need...
9" cake or tart pan. Use glass or Pyrex if you can. I discovered the rhubarb is acidic enough to remove some coating from my metal pan... so I think we ate some of the pan too.
1 sweet tart crust, unbaked (or skip the crust, or make a simple, modified crust)
Modified crust: 1/3 cup whole wheat flour, 1/3 cup rolled oats, 4 Tbsp butter
1 1/4 lbs rhubarb, washed and sliced into 1/4 to 1/2 inch pieces
1/2 cup + 2 Tbsp sugar, separated
2 Tbsp flour
1 pinch salt
1 cup half and half (I used whole milk)
3 eggs
1/2 tsp vanilla
butter to coat pan
Note: I baked this using a Dutch Oven over our Dickinson heater. You could also place a Dutch Oven on your range. Get your Dutch Oven preheating, just like a standard oven, while you prepare the tart. Start with medium-high heat, and adjust if necessary. If using a standard oven, preheat to 375 degrees.
1) In a large bowl, toss the rhubarb with 2 Tbsp of the sugar until evenly coated. Transfer the sugary rhubarb to a colander over the bowl, and let sit at least 2 hours to allow liquid to drain. Overnight is fine too.
 |
| This is only part of the rhubarb... not the full amount used. |
a) For sweet tart crust, roll out crust and fit into 9" tart/cake pan. Prick a few times with fork, and chill while oven is preheating.
b) If not using any crust, simply butter bottom and sides of 9" tart or cake pan.
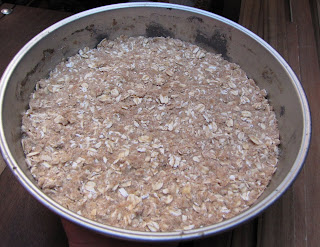
c) For modified crust, first butter bottom and sides of 9" tart or cake pan, then blend whole wheat flour and oats well in a small bowl. Cut in butter using pastry cutter or fingers. Once butter is completely blended in, press the crust mixture firmly into the bottom of the pan, making an even layer. Chill if possible. Don't worry if it's not.
 |
| Here is a secret. This "crust" is actually the recipe for an Apple Crisp topping. Shhhhh... |
 |
| Notice both hands are in the pic, meaning my own private food photographer took this picture. |
 |
| My tart ready to go in the Dutch Oven. See note below about elevating your tart. |
Note: You will need to secure an elevated surface in your Dutch Oven to prevent burning. I like to use an enameled metal plate.
5) Bake until custard no longer jiggles in the center and is just beginning to brown, about 30-45 minutes. The filling will puff dramatically, but will settle again as it cools. Remove from the oven and let cool a bit before serving.
We tried this tart both warm and chilled (on ice in our cooler). It was delicious both ways!! Also, there is a lot of info and possible steps here, but after you make it once, you'll see what an easy recipe it is!

No comments:
Post a Comment
Please be respectful and polite to everyone, so that I can keep the comment submissions open to all. Thanks!!