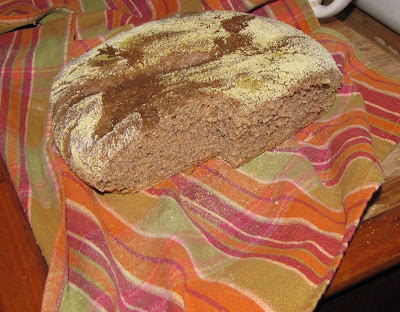
I baked bread!
In my Dutch oven! I’m not the first person to do this, but
I’m still pretty excited. When my lovely, red enameled Dutch oven first arrived
in the mail from friends, I had no idea how often I would use it. Nor would I
have imagined the value of such a heavy piece of galley equipment on a boat.
But I use it constantly, and now I’m using it even more because I’m turning
into a bit of a freak. A food freak.
How so?
Well, I am only a wee bit informed about the troubles
plaguing our food supply. I have read approximately ten pages out of The Omnivore’s Dilemma (I’ll read it through after I finish my current book,
Reality Bites Back), I finished a magazine article entitled Frankenfish, and I’ve
wondered for quite awhile why propylene glycol is an ingredient in some
cookies. Why is the main ingredient in automotive antifreeze in a cookie? Well, to keep it moist of course! But I don’t eat those cookies. Do you?
While baking at home, who thinks, “Honey, have you seen the propylene glycol? I swear I had half a bottle left..."
So, while I have been reading ingredient lists for quite
awhile, I am turning up the volume. There are still foods out there with
ingredients you can understand. Ingredients that do not require you to visit a
database for potentially carcinogenic materials to double check the snack you are about to
put in your mouth. And then there is the option of creating/baking/cooking at
home. I baked bread. And it only had four ingredients: flour, salt, yeast, and
water. Now don’t get me wrong, I am really looking forward to trying the
recipes for bread with extra ingredients. Ingredients like cheese. Or
peanut-butter and jelly (!), but I can understand those ingredients without
revisiting my college chemistry textbooks.
Jim Lahey's No Knead Whole Wheat Bread
 | |
| So good with butter! Real butter. |
You will need...
a Dutch oven!
3 cups whole wheat bread flour
11/4 tsp salt
1/4 tsp instant or other active dry yeast
11/3 cups cool water (55 - 65 degrees F)
wheat bran, cornmeal of additional flour for dusting
1) In a medium bowl, stir together the flour, salt and yeast. Add the water and, using a wooden spoon, mix until you have wet sticky dough, ~ 30 seconds. It needs to be really sticky to the touch. If it is not, mix in another Tbsp or two of water.
2) Cover bowl with a plate or tea towl, and let sit at room temperature (~72 degrees F) until surface is dotted with bubbles and dough has doubled in size. This will take a minimum of 12 hours, but Lahey recommends 18 hours. My trickiest part was keeping my dough warm enough, as our boat isn't exactly temperature controlled. But by keeping it close to our heater, but not too close, I did alright.
Note: If you prepare your dough around 8 or 9pm, it will be ready to bake the following evening and you can have fresh bread with dinner!
3) After first fermentation (that is what those 12 -18 hours were for), lightly dust work surface with flour and scoop dough out of bowl, in one piece, and onto dusted surface.
4) Gently fold and shape the dough into a round loaf for the second rise.
5) Dust a tea towel with bran or cornmeal, I used cornmeal. Place dough, seam side down, onto towel. Fold towel over dough and let rise until doubled in size, about one hour.
 |
| Doubled in size! |
6) Prepare Dutch oven. You need a flat metal surface that will nest inside, but be held above the bottom. My enameled plates work perfectly, as their size allows them to sit low enough without touching the bottom. Depending on what you have, you may need to use a trivet (or an empty tuna can) to hold your surface up above the bottom. Dust your plate/surface with bran/cornmeal.
 |
| Plate nesting inside Dutch oven, dusted with cornmeal |
7) Unwrap your dough and dust generously with bran/cornmeal. Invert onto your surface so that the seam side is up. Cover.
 |
| Seam side up! |
8) Bake over medium-high heat for forty-five minutes, lifting lid every ten minutes to allow steam to escape. I am lucky, in that I can bake mine right on our Dickinson diesel Lofoten stove. If you have one, use it! When the top is firm (but it won't get crunchy) and you can just smell the bottom of the bread toasting, the loaf should be done.
9) Remove from oven immediately and cool on a rack if you have one. I don't, but I have found that a colander works nicely. Once bread is cool, wrap in a tea towel to keep for up to 3 days.
 |
| A loaf of bread! Without a conventional oven! |
No comments:
Post a Comment
Please be respectful and polite to everyone, so that I can keep the comment submissions open to all. Thanks!!