Galley: 1) the kitchen of a boat. Sally: 1) a venture off the beaten path, 2) a military action in which besieged troops burst forth from their position, 3) a witty remark.

Monday, January 31, 2011

4TG Peanut-Butter Brownie Pancakes

This recipe is for Tim's girlfriend (4TG), who needs a gluten free diet. Thank you Tim for requesting this recipe, as it means my family will be eating the results this very night... as soon as I finish typing. So let's get going...

Necessity is indeed the mother of peanut-butter brownie pancakes. Late one evening, overcome with the need for chocolate, I ransacked our cupboards. Alas, there was nothing to be had that did not require an oven. Or so I thought! After brief deliberation, I decided that if the need is great, brownies can be made in a pan. Yes they can.

As it turns out, they are not quite brownies, which isn't too surprising. But they are chocolaty and wicked good with a glass of cold milk. I've revamped the recipe a bit since that first night to make them even better.

4TG Peanut-Butter Brownie Pancakes

1 stick of softened butter
2 ounces unsweetened baker's chocolate (chopped)
1 shy cup sugar
2 eggs
1/2 cup gluten free baking mix
1 shy teaspoon vanilla extract
1 heaping T. flaxseed meal
2 generous T. natural peanut-butter
4 T. milk
3/4 cup chocolate chips

1) In a small saucepan, warm unsweetened bakers chocolate (not the chips) and butter over very low heat. Mix occasionally until chocolate is almost completely melted. Remove from heat and continue stirring until smooth and uniform.
2) Move chocolate mix into a medium size bowl and stir in the sugar. Add eggs one at a time, mixing thoroughly after each. Set aside.


3) In a small bowl, mix together peanut-butter, milk and flaxseed meal. Stir gently until the mix is creamy and smooth.
4) Add peanut-butter mix to the chocolate mix and stir well.


5) Add gluten free baking mix. Stir well, then add vanilla and chocolate chips and mix again. Batter is ready!
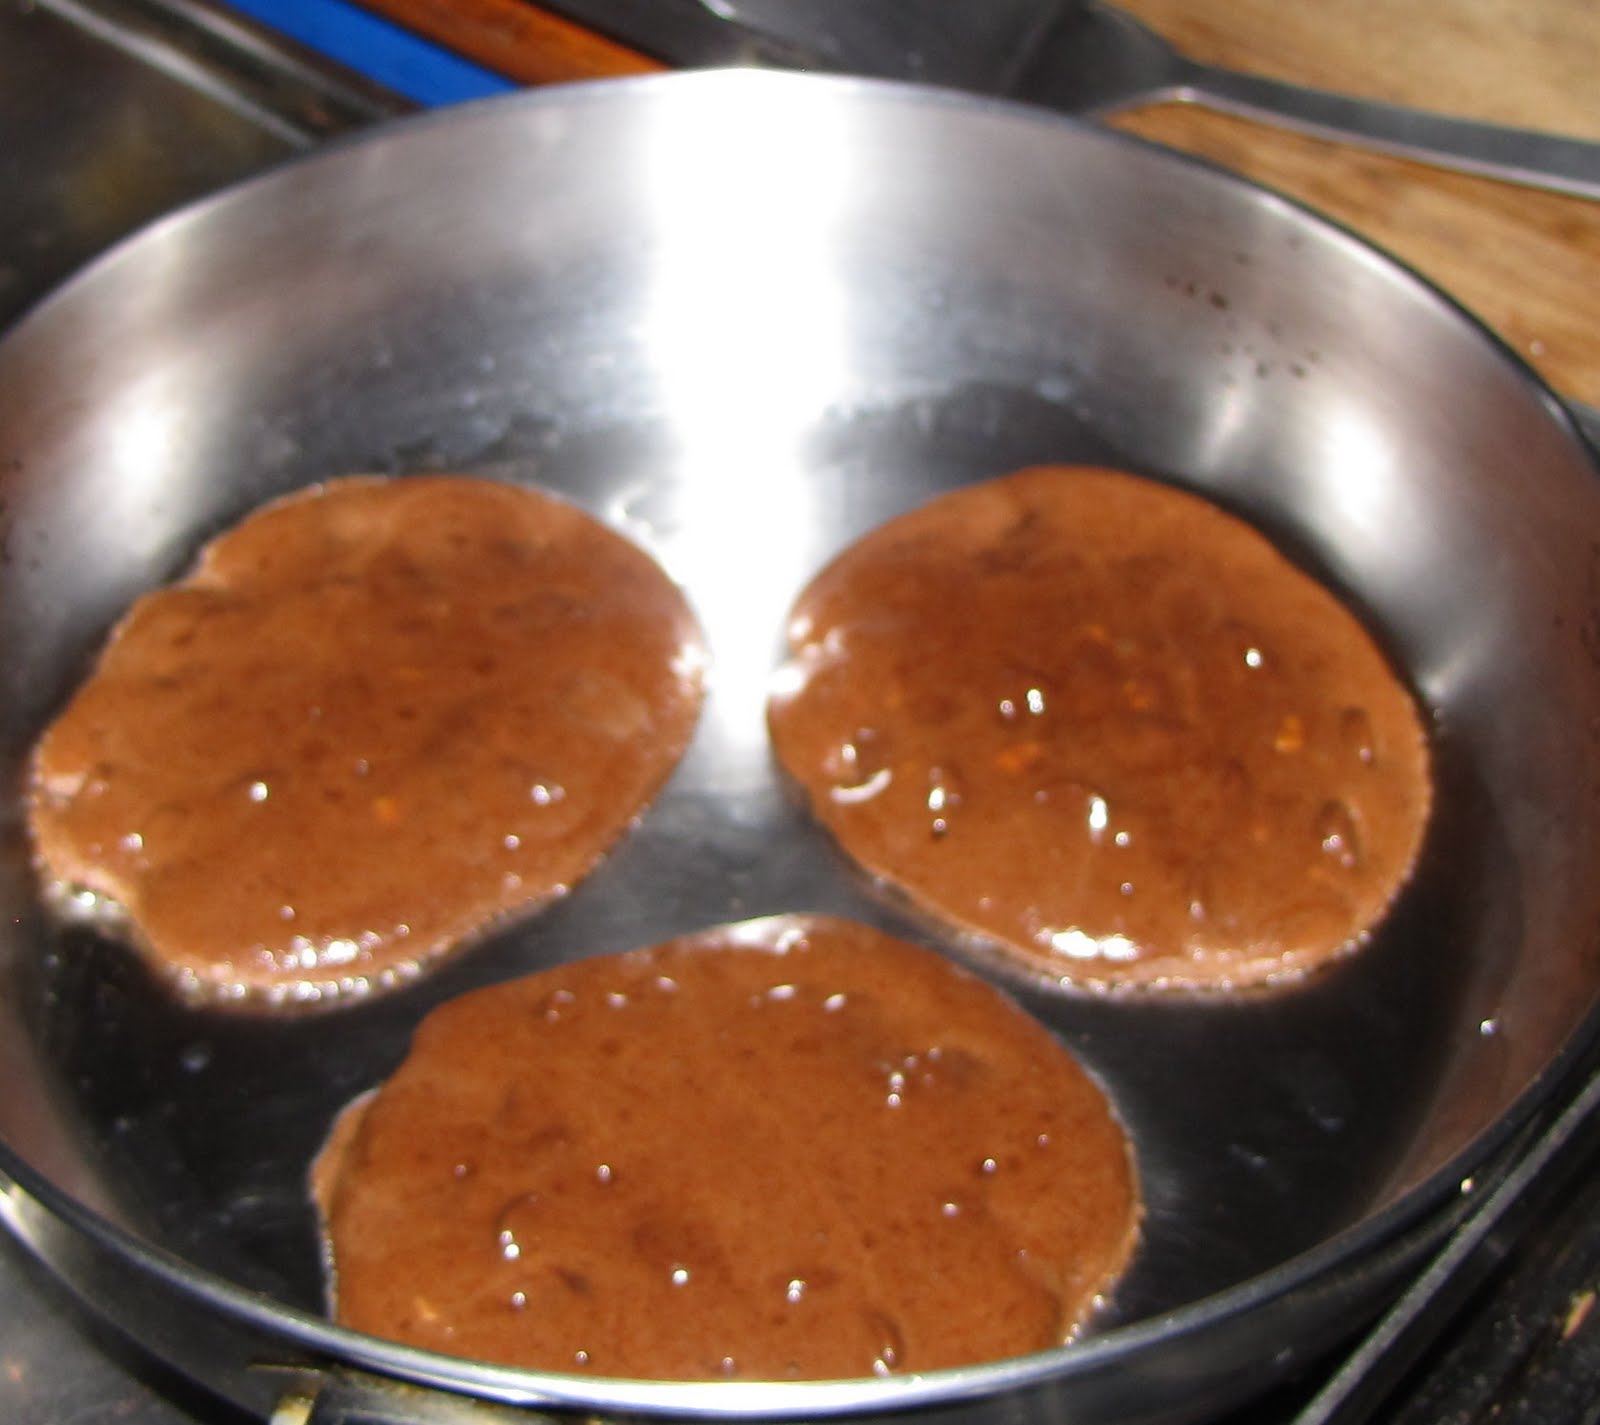
6) Warm a large frying pan over quite low heat. The flame should not touch the bottom of the pan. Lightly oil, and spoon batter onto pan in ~3 inch diameter cakes.

The tricky part!
Brownie pancakes don't cook like regular pancakes. If you wait until you see bubble holes on the tops, the bottoms will be burned. They need to cook slowly over low heat until the outer rims begin to set, but the middle is still uncooked. This requires patience and somewhat delicate flipping, but they don't stick at all so the flip still comes off well. That said, if you can't flip it, don't. It's not ready.


Once you have flipped them, they finish cooking very quickly. I'd say 30 seconds. For your first batch, be willing to sacrifice a couple to checking for "doneness" so that you get your timing right and don't overcook them.

Enjoy warm or cooled ("cakier" when warm, chewier when cooled)

Sunday, January 30, 2011

Burly Kid Pancakes, and Eggless to boot!

This is an old favorite, but I thought it might be new for others.

I created these pancakes a couple years ago with two goals: 1) to sneak as many healthy grains into my family as possible and 2) to amp up the protein power of a pancake. Thus was born the Burly Kid Pancake. It is also egg free, making it potentially easier for cruisers.

It was difficult, however, for me to create a specific recipe to post here. Part of the Burly Kid charm is that--on this boat anyway--it's a little different every time. I use what I have, and so proportions and ingredients vary. I tell you this so that you feel free to experiment with these cakes, and play with the ingredients as I do. I'll give some examples within the recipe.

This specific recipe will give you very tender and moist cakes.

Burly Kid Pancakes


Served a family of three with 3 cakes leftover...

2 Heaping T. flaxseed meal
1/2 cup water
1/3 cup mashed banana (could sub applesauce)
2 T. olive oil
1/3 cup rolled oats
1/3 cup wheat germ (could eliminate for gluten free diets and bump up baking mix)
1/3 cup ten grain cereal uncooked (8 grain is typically wheat free, but check)
1/3 cup polenta uncooked
2 Heaping T. nutritional yeast
2 Heaping T. whey protein (I use vanilla flavored)
1/3 cup Orange Juice (could sub other fruit juices)
1/2 cup plain yogurt
1 cup gluten free baking mix (or 1 cup flour plus 1 tsp baking powder and dash salt)
1 1/3 cups milk

1) Mix flaxseed meal and water together in medium mixing bowl. Let sit five minutes.
2) Add mashed banana and olive oil and stir well.
3) Add oats, wheat germ, ten grain, polenta, nutritional yeast, whey protein, orange juice and yogurt. Mix these ingredients well, then add milk and mix again.
4) Stir in the baking mix OR flour plus baking powder and dash salt.
5) Let batter rest while pan heats over low heat. Lightly oil pan, and spoon out cakes that are ~ 3-4 inches diameter. Bigger cakes will be harder to flip, as these are moist and tender (which also equals yummy).
6) When small bubble holes form on the tops, flip your cakes. When bottoms are golden brown, serve them up hot! Top with your favorite pancake toppings.

NOTE: If your cakes are sticking, your pan is likely too hot. You should not need to oil pan in between batches. Also, for me, the first cake always sticks a bit, and after that it's golden.

They only look like regular pancakes...

Friday, January 28, 2011

Sushi!!

I was very excited to give sushi a shot (hence my title's exclamation points), and my three-year old was excited too. We've read Rosemary Wells "Yoko" often enough that sushi was accessible to her. And after enjoying sushi at the home of friends I thought it was accessible to me too.

I still think that. I just think I need practice too.

The Nori wraps I bought sat in my galley cupboard for at least a month before I decided, what the heck! I took the "plunge into cooking vow" AND I have a blog where I can write about it. What more am I waiting for?

At the store, I stayed basic and bought cucumber, avocado, carrots and smoked salmon (a dodge around the raw fish sourcing issue). At home, I realized I only had brown rice, but forged ahead. I even minced up Kale into wee, wee little bits, pan fried it, and stirred it into the cooked rice (three year-olds eat kale when it is tiny. And yes, yes I know about Kale Chips but don't have an oven yet. Soon!).


Next,I sliced the cucumber, carrots, and avocado into slender strips and did the same with the smoked salmon. These items can all be arranged prettily on a cutting board or plate/bowl. Voila! Everything looked lovely, and the galley was still pretty darn clean.

Now, this next part I was less sure about. I had watched my friend gently heat the Nori wraps, one at a time, over a burner on her range. The wrap was held in tongs six-ish inches above the heat, then flipped to heat the other side. Hers were perfect. I kept missing the window. My wraps were either too cold or too hot. On either side, they didn't stick to themselves well and one even broke. My husband ventured the thought that perhaps sticky rice is moister, and thus lends some increased water/flexibility to the wraps... hmmmm.

But we made sushi! We spread the rice/kale mix on the wraps, then placed the veggies and salmon on the rice, and rolled them up. We dipped in soy sauce--I need to buy wasabi.

PROS: Tasted yummy, very healthy, super easy clean-up.
CONS: Brown rice doesn't hold together, kept falling out.
STATUS: Will research proper Nori heating technique and buy the right rice.

Here is a picture of the "yummy but not real pretty" sushi.

Thursday, January 27, 2011

Keeping it real...

Last night I was sick. Back in the pioneer days I would have been forced to rally and at least make dumplings, but last night I opened two cans.

Even canned chicken soup simmering on the stove smells and tastes pretty darn yummy. The whole family had some, and I went to bed.

Lesson Learned: Even when engaged in culinary exploration, its good to keep emergency rations on hand.

Tuesday, January 25, 2011

For Scott and N

Mascara or Lipstick? Scott and N were the only ones to reply on this blog... perhaps fortunately for me, as it made my own assignment much easier.

I wanted to see if I could come up with something yummy using the "favorite ingredients" submitted by folks, and the two ingredients given high marks were peanut butter and hot-sauce.

What to make? Noodles with spicy peanut sauce!! So, so simple and delicious to boot.

I had around 5 oz. of "nest noodles" left over from sometime last year, so decided to use them up. I cooked them first (boiling water, salt, you know the deal), then drained, then stirred in a Tablespoon of Olive Oil until the noodles were uniformly coated. Into the cooler with the noodles!

Next stop, peanut sauce. Into a small bowl, I added:

2 generous T. peanut butter (natural, crunchy style)
1 teaspoon of sugar
2 T. soy sauce
1 teaspoon white vinegar
1 teaspoon sherry
and a squirt of Sriracha hot sauce (season to taste, depending on your sauce and what you like. It is easy to stir in more if you want)

1) Mix the above ingredients well.
2) Add hot water slowly, stirring well, until your sauce is creamy and about the consistency of a cheese sauce.
3) Pour peanut sauce over cold noodles and mix gently to coat noodles thoroughly.

I garnished with a sprinkling of sesame seeds.

Verdict: I want to make this again! Soon!

Monday, January 24, 2011

Weekend Trip. No Cooking.

We spent a wonderful weekend away from home, staying with friends on the mainland and skiing!!

As such, I'm afraid that we consumed a fair amount of trail mix, yogurt, cheese sticks, and salami on crackers, but nothing that I actually cooked.

I did slice french bread for french toast with fruit on Sunday morning... but that was truly the extent of my work in the kitchen. And it was a kitchen, not a galley.

But now it is back to boat and back to the blog! This very day I will cook again! Stay tuned...

Wednesday, January 19, 2011

"Pinning Wheel"

I've been exploring some truly lovely food blogs, and am impressed by all the incredible photographs of food. It is quite inspiring (I want to eat THAT!), and vaguely bewildering to me. How do these chefs handle sizzling pans, messy chopping blocks, wooden spoons, knives AND deftly wield a high definition camera? With clean fingers?

Last night, when I made my veggie pancakes, I fully intended on beautiful images of grated green zucchini and bright orange squash... but was tipped past the point of photography by my three-year old racing up and down the length of our cabin, pin-wheel wildly spinning and shouts of "Watch me, mommy! Mommy! Watch me this time again!"

I admittedly gave up on the camera in favor of watching her flying about in red velvet with a sparkly blue and silver "pinning wheel." I should have laid down the grater and taken a picture of that.

Tuesday, January 18, 2011

Anything can be a pancake

In my explorations with no-oven cooking, I have joked that anything can be a pancake. I have made the aforementioned peanut-butter brownie pancakes. I have made puffins, which are muffins cooked pancake style (On this boat, cornmeal puffins were rated higher than their more common muffin form). I have also made veggie burgers and salmon burgers, which are really yet another pancake, and potato pancakes, and many, many variations on the original pancake (banana, peach, chocolate chip, to name a few).

Today, I discovered Veggie Cakes (very different from Veggie Burgers). I am excited. Granted, I'm not breaking away from the pancake, but Veggie Cakes are something healthy, yummy and easy, with the added bonus of FEW dishes. It really does seem that anything can be a pancake.

Veggie Cakes

1 cup grated zucchini ( 1 slender zucchini was perfect)
2 cups grated winter squash
1/2 onion, grated
1 egg
generous 1/4 cup flour (I used a gluten free one, but white or wheat is fine)
1 shy T. of fresh ginger, peeled and minced
salt and pepper to taste
2-3 T. olive oil

1) Grate your veggies and place in a medium mixing bowl. Add egg, flour, ginger, salt and pepper. Mix thoroughly.
2) Heat pan and 1 T. olive oil over medium heat. Drop spoonfuls of veggie mix into pan. Flatten cakes evenly with a spatula. Cook, turning once, until a deep golden brown on each side. The size of your pan will determine how many batches you make. You may need to oil your pan between batches.

NOTE: If you have no oven, serve immediately. If you do have an oven, you can keep your early batches warm at about 250 degrees until all your cakes are made.

I served our Veggie Cakes with pork sausages. The cakes were yummy with ketchup, and our three year-old happily ate one large cake. Plenty of veggies!

If you have turned something into a pancake, please let me know and we'll add it to our list.

Monday, January 17, 2011

We Love Ginger

I have made stir fry before, but this is the first time I kept an eye on some instructions... and the first time my husband kept saying how great it tasted. If everyone dining loves ginger, you're pretty much guaranteed success.

Sweet-and-Sour Tofu with Green Beans and Broccoli

(adapted from "everyday food" magazine)

1 cup brown rice
1 T. cornstarch
1 T. olive oil
1/4 cup sugar
1/4 cup white vinegar
1/4 cup soy sauce
1 pound firm tofu (sliced into comfortable bite sizes)
1 cup broccoli florets
2 bell peppers seeded and diced large
1/2 pound green beans trimmed
5 scallions, thinly sliced
2-inch piece fresh ginger, peeled and minced (2 and 1/2 inches if you love ginger)
2 T roasted peanuts, chopped

1) Set rice to cooking. Usually 2 cups water to 1 cup rice, but check your package for instructions. Some varieties differ slightly. While rice cooks, whisk together cornstarch, sugar, soy sauce and vinegar in a small bowl. Set aside.

2) In a large skillet, heat oil over high. Add bell peppers, green beans and broccoli and cook, stirring frequently, for about five minutes (or until vegetables start to soften).

3) Add scallions, ginger and garlic and cook, stirring frequently for about 3 minutes, or until vegetables are just short of done. Add tofu, stirring gently to mix throughout vegetables. Tofu should be hot in 1 to 2 minutes.

4) Whisk your soy sauce mixture again and add to skillet. Cook, stirring constantly, until sauce thickens. Remove from heat.

5) Fluff rice with fork then serve, spooning tofu mixture over rice and topping with peanuts.

This was quite fresh and delicious tasting, and simple for a cook who is learning to cook.

Sunday, January 16, 2011

Mascara or Lipstick?

I don't typically wear makeup myself, but have on occasion read the articles quizzing women on what beauty product they absolutely wouldn't give up. The "desert island" question. You only get to keep one, what would it be?

I'm curious about this from a culinary standpoint. What ingredient or item do you feel you MUST have in your galley or kitchen? Maybe you wouldn't be able to make a complete meal or dish with it, but what is the desert island security blanket of your cooking? Or snacking? Or baking?

For me, lentils are darn close to the top, but the winner is nutritional yeast. I use it in almost everything, and if all else fails you can eat it, uncooked, with a spoon (you might not want to, but you could. Lentils fall short there).

Nutritional yeast is hard to beat. Two heaping tablespoons contain 17% of your recommended daily value for protein. It is incredibly high in Folic acid and the B vitamin complex---crucial for crew morale. Complete nutritional info here.

It amazes me.

What food amazes you?

Saturday, January 15, 2011

2 Winter Dinners for the Work of 1

If you have a refrigerator/freezer, leftovers don't present a problem. You wrap them and hide them away. You can forget them for a week and you're still okay. I won't show you a picture of our neighbor's refrigerator (see his stove in my last post), but the point is we don't have one (yet! stay tuned for that day). My years without refrigeration include life on three different boats plus one tent, so it is near the norm now. There are lingering Ben&Jerry's fantasies... but we cope.

On our last boat, we coped with a wonderful "fridge locker" that was below the water-line. In the winter, milk and beer were cold and yogurt lived happily for a long time. On our present boat, we cope with a cooler. Sometimes there is even ice in it! Earlier this week, there was ice, and I made two dinners for the work of one.

If you have never made Mark Bittman's red bean's and rice with coconut milk, you really must. It is a delicious, filling and cozy winter meal on it's own, and has the added benefit of... lots of leftover red beans with veggies. The ingredient list is short, and you can even drop the celery and bell peppers if they aren't available (but I recommend keeping them if you can!!).

On Tuesday, I made the Red Beans and Rice. You will note in the recipe (via link) that you are left with 3-4 cups of Red Beans and Veggie mix. These leftovers go into a sealed container. If you have NO cooler or refrigerator, you'll want to use them the very next day. Sitting on ice in our cooler, I kept them until Thursday and made:

Fast Chile


3-4 Adult servings


3-4 cups Red Beans and Veggies
1 can kidney beans
1 can diced tomatoes
1 packet Chile seasoning (adjust amount used to taste)
1/2 jar pasta sauce (leftover from the No Oven/No Mess Lasagna)
1 T Molasses
1 cup grated cheddar cheese

This is almost a one step recipe!

1) Everything but the cheese goes into a cook pot. If you don't like your food too spicy, use only 1/2 the packet of seasoning. If you like to heat things up, use it all! Mix ingredients and heat over medium until simmering.
3) Serve into bowls, top with cheese, enjoy.

Like the No Oven/No Mess Lasagna, you'll notice shockingly few dishes.

Friday, January 14, 2011

No Oven/No Mess Lasagna

Our next door neighbor, also a live aboard, has one of these: Viking Freestanding Range
I might not have the exact model on display, but you get the idea (and you get the idea that I have a wee bit of stove envy).

Our own galley has a three burner propane range. No oven. But let this not be a complaint (plus a new one is on the way)! Let it be an incentive for invention. Last year I created peanut butter brownie pancakes, a method for no-bake brownies. Last Wednesday night, with ingredients on hand, I created the No Oven/No Mess Lasagna. No matter where you are, less mess is nice. But on a boat, where water is often at a premium and dishwashers are rare, it becomes even more important.

So, no oven, but you do need a Dutch Oven. We are lucky enough to have a gorgeous, red, enameled cast iron one, given to us by wonderful friends. Here is the recipe. Not gourmet, but about as easy and inexpensive as it gets.

No Oven/No Mess Lasagna


4-5 adult servings


1 1/2 Jars ready made pasta sauce (I used Prego's Italian Sausage and Garlic)
1 lb. Small-curd Cottage cheese (if you have Ricotta, go for it!)
10 lasagna noodles
~1/3 1b. shredded cheddar cheese (or more to taste)
1 T. olive oil
1/2 tsp. salt

1) Boil water, olive oil and salt. Add lasagna noodles and boil approx. 8 mins.
2) While lasagna noodles cook, grate cheddar cheese.
3) Drain lasagna noodles into colander. Pour pasta sauce and cottage cheese into pot formerly occupied by noodles. Stir and warm gently.
4) Time to layer! A little sauce mixture into the bottom of the dutch oven, followed by two lasagna noodles side by side. Spread more sauce over noodles and a layer of cheddar cheese, then two more noodles. Repeat! With ten noodles you will have five noodle layers (assuming your dutch oven is roughly the same size as mine...)
5) Be sure to end with sauce and set aside enough cheese for a final, topping layer.
6) Cover your creation and adjust burner to not quite low, but close to low. The most difficult part of this recipe is getting its entirety bubbly hot without burning the bottom. Listen/Check for bubbling.
7) Once it is bubbling, turn burner to a low low and add final layer of cheese. When cheese has melted, turn off burner and allow to sit covered for five minutes. Time to eat!

Clearly, there are many yummy things that could be added to this recipe. While making it I dreamed of a layer of sauteed onions and spinach. But this is a base, and we all enjoyed dinner.

P.S. I'm a newbie. I didn't take any pictures, but I'll get better about this!

Thursday, January 13, 2011

New Year's Resolution, Continued

Oh Nigella! That British accent, your carefree approach, the ingredients I could count on one hand. All this combined created a new culinary confidence in myself. I headed to the market, grabbed a basket... and realized that while listening to the interview, I had neglected to write down any measurements, quantities or proportions. Proceeding a bit more slowly now, I bought garbanzo beans (1 can? 2 cans?), canned cherry tomatoes (did you know they came in cans? I didn't), chorizo sausage, dried apricots, and a bottle of cooking sherry.

Back at home, I was struck by the fact that two months had passed since that morning in the car. Two months for memory, and recipe instructions, to fade. A moment of paralysis, followed immediately by the thought that the whole point of the recipe was simplicity. I would wing it.

Sausage sliced and sizzling in the pan, I stared at my list and decided that surely I had written it in the order of additions. Sherry was next. I had never used sherry. How much to add? When to add? Into the cooking sausage? After the sausage was cooked? Or maybe my list wasn't in order after all!? I fell back on tradition, and did what I always do when immobilized by the stove. Knowing he was at work, I sent my friend "S" a text: "Making sausage and tomato stew. When do I add the sherry?? Help!"

I poked at the sausage and waited... a phone call! It was him! With grace and laughter (and using up his break time at work) he told me all about sherry and made some suggestions. Empowered once more, I returned to the galley and realized I had neglected to ask, "How much?"

Big Sigh. I dumped some in.

On to ingredient number three! I added two cans of garbanzo beans, waited until they were warm, and opted for just one can of cherry tomatoes. Everything simmered away fragrantly while I chopped up dried apricots---don't ask me how many--- and tossed them in. With the burner adjusted to the lowest of low, I peered in.

It was so pretty! Almost festive. I think it was the first time I cooked something so bright and merry looking. AND it tasted great. Definitely up for a repeat... but not too soon!

Wednesday, January 12, 2011

New Year's 2011

Much is written about New Year's Resolutions, so I'll be brief on this point: I made one. One resolution. I resolved to deviate from my well-worn shopping list and grocery stops. I am (and I'm sure my family is) ready for new tastes, new dishes, new recipes and discoveries and spices. My biggest hurdles? First, I'm not a cook. That title goes to my husband, but I am the one with the time to cook. Second, my culinary explorations must be defined by an air of frugality. Such are the times. Finally, my kitchen is a galley. A small and sometimes awkward space, but not an excuse for deadly repetition at dinner time.

Inspiration for my resolution struck one predawn morning in the ferry line-up. I am rarely alone in the car, but that morning I had one silent, dark hour to spend listening to the radio. NPR Morning Edition. A treat! Best of all, the host was conducting an interview with a woman named Nigella, and Nigella was sharing a simple recipe. I had never heard of this British chef before (can I use the "not a cook" excuse again?), but she made me believe that I could execute a lovely AND simple dish. I hastily wrote down the ingredients, and listened to her instructions. I vowed to make the dish the very next time I made dinner. I would! I could! But I didn't...

Two months passed, New Year's Eve arrived. It was time to renew that vow, and head to the grocery store.